|
|
|
Leads Exporter
Usage
|
Select Leads Exporter from the Plugins menu of Qxtender.
If Qxtender is already connected to QuickBooks, you will see the Data Mode type, year version of QB, and the name of the company in the title bar of Qxtender.
If the plugin supports the current Data Mode it will open when the menu item is selected (so skip to next step).
If the current Data Mode is not supported, a message will be displayed informing you which Data Modes the plugin does support. See this page for instructions on changing the Data Mode.
|
|
The Plugin opens, with the Notices tab displayed.
Please read the notices on this page.
The Version Information section includes a Check Plugin Version link that will open your browser to the information web page for this product, on which you can compare your current version to the latest. If a new version is available, run Qxtender's Online Update utility to update to the latest version.
The Related Information section includes links to helpful information, if available.
|
|
Click the Setup tab.
Typically, this is where you set options prior to running the plugin's Get Data operation. However, this plugin currently has no options.
The text on this page includes information about how the functionality of the plugin may be limited by your version of QB:
- QB 2017, when it is released, may begin providing access to this data via the QB Integrated Applications API. This plugin will be updated at that point to support Qxtender's QB Integrated App Data Mode.
- QB 2012 through QB 2016 are limited because Intuit has not yet implemented access to this data via the QB Integrated Applications API. The only way to effectively retrieve the data is by user-interface automation such as with Qxtender's QB App Control (QBAC) data mode.
- QB 2011 and prior do not have the UI capability for any of the data this plugin is designed to retrieve. The Leads Center first appeared in QB 2012.
|
|
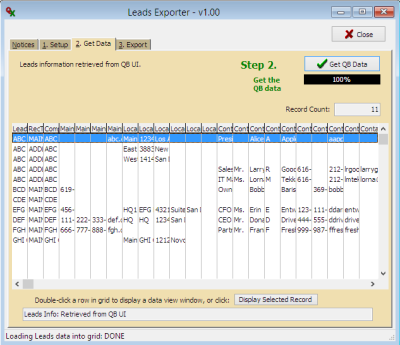
Click the Get Data tab.
Click the Get QB Data button.
|
|
The plugin begins sending keyboard commands to QB. It will open the Leads Center and iterate through each Lead, opening associated dialogs and copying data from UI, and storing the copied data. A dialog displays during this process providing information about the data being requested and progress of the operation.
Once the data has been retrieved from QB the Data Mode progress dialog will close.
Next, the plugin processes the data and begins filling the grid .
During this process progress information will be displayed in the plugin's task bar (at the bottom of the form).
|
|
When the Get Data operation has completed, the settings in effect are displayed, the Record Count is shown, and the grid has been filled with data.
The purpose of putting the data into a grid in the plugin, rather than just exporting it directly to file, is that it gives you a quicker way to check the data for any reason to change the settings.
You can re-run the Get Data operation as many times as you wish, in case you have changed the plugin's settings, or changed or added data to QB. Any existing data in the grid will be removed and replaced.
Since there are a lot of columns of data, they are quite narrow at the plugin's default size. You can of course resize the window to widen it, which will expand the column widths.
|
|
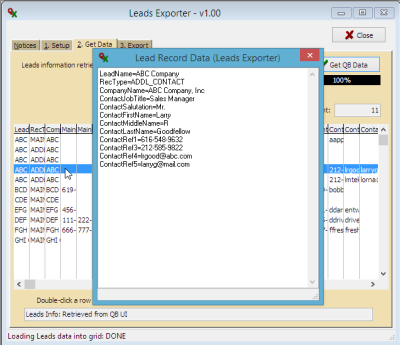
To display a pop-up window with the data from a single row, double-click the row. The window will stay on top, and you can double-click other rows to display their data.
You can also delete the selected row in the grid by pressing the DELETE key. You can select a range of rows for deletion by clicking one row, then SHIFT+CLICK on another row.
|
|
When you are ready to export to file, click the Export tab.
Click the Save Leads info to file... button.
A standard file save dialog will open. The filename will be pre-filled with a default name which includes the current date. You may change it if you choose and select a different folder. The default file format is comma-separated (CSV), but you can change to tab-delimited if you choose. Click the Save button on the file dialog.
|
|
Once you have saved the data to a file, the file name and the location of where on your system you chose to save it is displayed.
Several options are provided to easily open the file in Excel, or other applications.
|
|
Copyright Qtools Software - © all rights reserved
QuickBooks, QuickBooks Pro, QuickBooks Premier & QuickBooks Enterprise are registered trademarks of Intuit, Inc.
|
|
|