Tools for Accountants, Bookkeepers 
& Small Business Owners
Downloads | Purchase | Support | Links | Main Page | News | Search |  
Products:
Qslip
Prints Deposit Slips
Qxtender
Hosts Plugins
Qxtender Plugins:
Contacts
Exporter
Leads
Exporter
ShipTo Address
Exporter
CA - DE-9/9C
Quarterly Report
CA - DE-542
Contractor Report
IRS - 941 &
Schedule B
NY - NYS-45
Quarterly Report
TX - C-3/C-4
Quarterly Report
 

Create a RAID1 Mirror Array Using RAIDXpert

The purpose of this tutorial is to describe how to use AMD's RAIDXpert software to create a RAID1 Mirror array from an existing source disk and a second disk. The data on the source disk is preserved. ALL DATA on the second target disk is erased.

The motherboard is an ASUS M4A78T-E with an SB750 chip.

Prior to creating the RAID1, the system had two 500 GB Western Digital disks. By selecting the disk boot order in BIOS, disk 1 on SATA port 1 was bootable to Windows XP, and disk 2 on SATA port 3 booted to Windows 7 Ultimate 64-bit.

IMPORTANT: Prior to installing Windows 7, the BIOS was set to RAID and the AMD/AHCI RAID driver was provided to the OS Installer. This resulted in both disks appearing as separate RAID READY disks.

The purpose of this migration was to mirror the Windows 7 disk, wiping the XP system in the process.

STEP 1: Ensure that you know which SATA port your source and target disk are plugged into.

STEP 2: Turn off power saving features of OS so that the RAID migration can complete without interruption.

STEP 3: If you haven't already done so, install RAIDXpert. It is available on the AMD website.

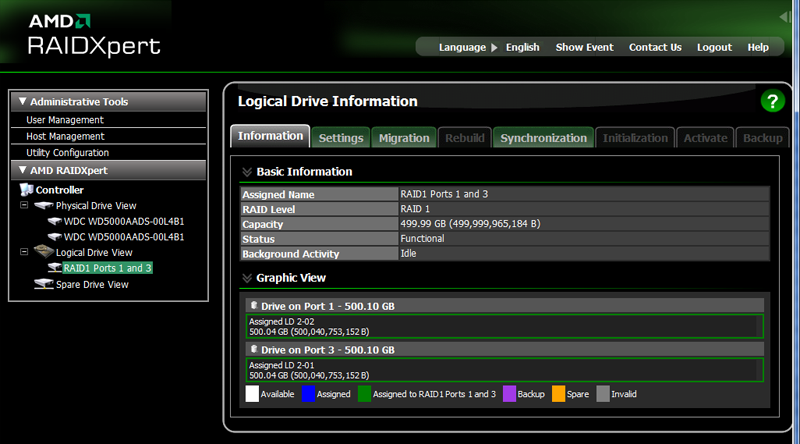
STEP 4: Launch RAIDXpert. It opens in your web browser. The default login is "admin" with password "admin".

STEP 5: Click on the Physical Drive View in the left pane to view information about the disks.

For this tutorial:

Windows 7 System disk: port 3

Spare disk: port 1

Step 6: Click on the Logical Drive View in the left pane to view information about the logical disks.

For this tutorial:

Windows 7 System disk: RAID READY LD 2-01 on port 3

Spare disk: RAID READY LD 1-01 on port 1

Step 7: Click on the Target Logical Drive in the left pane to view and verify information about the disk. This logical disk will be deleted.

Step 8: Click on the Logical Drive View in the left pane.

Select the Delete tab page.

Check the box next to the target spare logical disk.

Click Submit button.

Step 9: Click OK to confirm deletion of logical target disk.

Step 10: Click OK to confirm erase of data on of logical target disk.

Step 11: Select the logical source disk (RAID READY LD 2-01 in this example).

Step 12: Select Migration tab.

Set "Migrate RAID level to" to RAID1.

Click on Single Disk which will be on the port number of the target disk -- this MUST be the spare disk, verify the port number.

Step 13: Note that the disk has been selected (red border).

Click Start Now button.

Step 14: Click OK to begin the migration process which will mirror the source disk onto the target disk.

The beginning of the migration process.

Here is about 10 minutes into the process. It seemed to be running at about 1% per minute on this system and disk size.

I was able to use the system during the process, but avoided doing anything with significant disk access.

The process completed after about 2 hours. This dialog is somewhat oddly worded. But, clicking Yes does initiate a reboot, so save any other work before clicking Yes.

After the reboot, this message appeared, along with another reboot message. So 2 reboots are required after migration.

After the second reboot this is what shows in RAIDXpert.

I changed the assigned name on theSettings tab from "RAID READY LD 2-01" to "RAID1 Ports 1 and 3".

Copyright Qtools Software - © all rights reserved

QuickBooks, QuickBooks Pro, QuickBooks Premier & QuickBooks Enterprise are registered trademarks of Intuit, Inc.