Tools for Accountants, Bookkeepers 
& Small Business Owners
Downloads | Purchase | Support | Links | Main Page | News | Search |  
Products:
Qslip
Prints Deposit Slips
Qxtender
Hosts Plugins
Qxtender Plugins:
Contacts
Exporter
Leads
Exporter
ShipTo Address
Exporter
CA - DE-9/9C
Quarterly Report
CA - DE-542
Contractor Report
IRS - 941 &
Schedule B
NY - NYS-45
Quarterly Report
TX - C-3/C-4
Quarterly Report
 

Qslip - User Guide - Setting Layout Options


Select the Basic Options tab.

Select the fields you want printed on your deposit slips under "Print on Slip." Unchecked items will not be printed.

Choose the fonts. The amount font must be a TrueType, fixed-width font in order to print properly, such as "Courier New."

Set the font sizes (in points) that best fit your deposit slip format.

These positions for these fields are set on the Layout & Add'l Layout tab pages.


If the deposit slip is set as 2-sided, there will be additional items to set.

The positions for these fields are set on the Side 2 Layout tab page.


Select the Depositor Options tab.

Set which fields to print using the check boxes.

Edit the field values for you or your company, and your bank. (Click the "..." button next to the Name field to copy all the fields data from another Slip Format)

Make font and font size changes, if necessary.

This information will print on the deposit report regardless of the "Print on Slip" setting.

The positions for these fields are set on the Depositor Layout tab page.

Built-in Background Styles used for printing complete deposit slips use the OTHER TEXT field for encoding the MICR line for transit number and account number.

Use an existing deposit slip as a guide, or check with your bank for their required format.

Use the letters a, b, c , d to print the MICR symbols.

Qslip installs a free, open source font, GnuMICR, to use for the MICR line. The size should be set to 12 point for GnuMICR. If you are using the MICR Encoding font, the size should be set to 20 point.

(Since many banks now include optical scanning of deposit slips, the built-in styles that print complete deposit slips should be accepted by your bank. However, some banks still require printing with magnetic ink. If your bank rejects your deposit slip due to this you may want to consider purchasing magnetic toner for printing your deposit slips. Or use Qslip to print onto a conventional pre-printed deposit slip.)


Select the Printer & Formatting tab.

Set the extra character spacing for amounts. This is primarily used to align digits with the pre-printed boxes or columns on some deposit slip formats. (0 is default spacing, 100 is twice normal, 200 is 3 times normal, and so on).

(enabling Decimal Point and/or Thousands Separator will disable extra character spacing.)

Select the printer you wish to print your deposit slips.

Set the printer resolution (optional).

Set the orientation if necessary.

Set the overall Horizontal and Vertical alignment. This will move the entire deposit info image left-right, up-down. This also lets you leave your printer set to standard 8.5" x 11" paper, which allows printing closer to some edges of the deposit slip.

This setting is very important when you want to position your deposit slip image on your pre-printed slip. It moves all the fields equally. Use it to offset the printed image to the position your printer feeds your deposit slip.
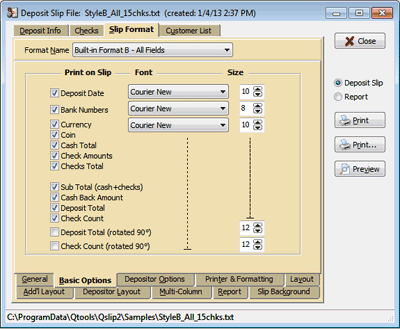
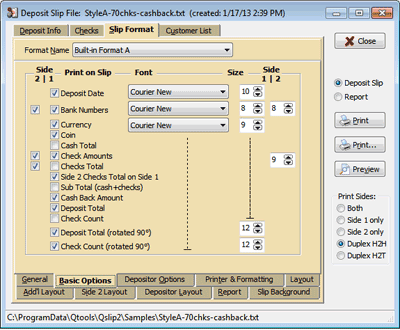
Slip Formatting:

Print Decimal Point: If your pre-printed deposit slip does not include a vertical line in the items section separating dollars and cents, enable this feature. For built-in complete deposit slips, you can choose either setting.

Print Thousands Separator: All amounts will display a thousands separator (e.g. 9,999.99).

Print Zero (0.00) Amounts: For any values that are zero, when this option is checked 0.00 will be printed, if unchecked nothing will be printed (blank).

Print Currency Symbol on Total: The Deposit Total and Rotated Deposit Total will print a currency symbol. For pre-printed deposit slips, disable if a currency symbol is pre-printed. For built-in complete deposit slips, you can choose either setting, but check with your bank.


If the deposit slip is set as 2-sided, the Side 2 character spacing and Alignment controls will be enabled.


Next: Set the Layout Positions your deposit slip layout.

Copyright Qtools Software - © all rights reserved

QuickBooks, QuickBooks Pro, QuickBooks Premier & QuickBooks Enterprise are registered trademarks of Intuit, Inc.