|
|
|
NY - NYS45 - Quarterly Report
Usage
|
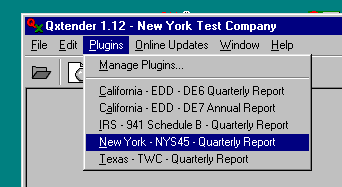
Select New York - NYS45 - Quarterly Report from the Plugins menu of Qxtender.
If you have a QB Company file loaded, the next step will be skipped.
|
|
(Export Mode only)
QuickBooks 6,99,2000:
Select the Employee/Payroll Items list exported from QuickBooks.
QuickBooks 2001 up:
At the first fileopen dialog, select the Payroll Items list report exported from QuickBooks.
At the second fileopen dialog, select the Employee list report exported from QuickBooks.
How to export the list(s) from QB
Or see the Readme file included with the Plugin for details on exporting this file from QB.
|
|
The Plugin opens, initialized with Payroll Item and Employee information.
Please read the notice on this page.
Internet links are provided in case you need more information to complete and file your return.
|
|
Now, follow the steps indicated on the Plugin.
STEP #1: Click on the Setup Payroll Items tab.
Set the Report Period to the Quarter you wish to report.
|
|
STEP #2: Select the Payroll Items. (this is necessary since Item names are not standardized in QB and users can edit them).
The Plugin will attempt to automatically select the correct payroll item(s). If the this does not occur, you will need to rename the payroll item(s) in QB to match the name(s) shown in the Payroll Items to select box.
Next, check the box next to any city tax items you withhold. If you are unsure, you can select all of them as long as there is a corresponding Payroll Item in QB.
To manually select the items, copy items from the QB Payroll Items list to the Payroll Items to Report list. You can copy them one at a time or you can multi-select the items by holding down the CTRL key while clicking. Using the mouse, drag the selected Payroll Item(s) from the QB Payroll Items list on the left to the Payroll Items to report list on the right. You can also copy the selected item(s) by clicking the button between the lists, or double-click the item.
The items must be ordered in the Payroll Items to Report list as noted in Payroll Items to Select. Use the Up/Down arrows next to the list to change the position of an item in the list.
To delete an item in the Payroll Items to report list, select it and press the Delete key, or click the Trashcan button.
(note: Curly Brackets are used to combine payroll items into a single amount for reporting purposes. The Curly Brackets and the text contained are ignored during calculation. For example, if you select a Payroll Item to report named New York City Withholding and you also have a QB Payroll Item named New York City Withholding {extra}, any amounts for either item will be calculated as one total.)
|
|
STEP #3: Click on the Setup Special tab.
Make any necessary settings for special handling of specific payroll items.
|
|
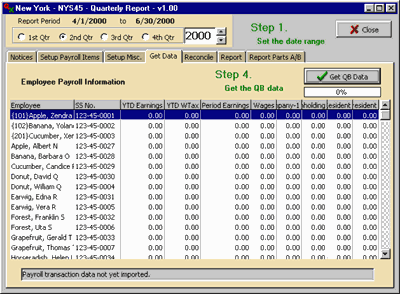
STEP #4: Click on the Get Data tab.
All employees in the QB file will be shown, including inactive employees. After processing, employees with no activity during the report year will be removed from the list.
(note: Curly Brackets and the text contained is removed from employee names when printing. This allows you to deal with employees with the same name, or to sort your employee list by using a curly bracketed prefix.)
Click the Get QB Data button.
If you have a QB Company file loaded, the next dialog will be skipped.
|
|
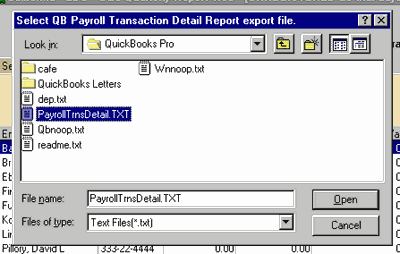
(Export Mode only)
Select the "Payroll Transaction Detail Report" exported from QuickBooks.
How to export this report from QB.
Or see the "Readme" file included with the Plugin for details on exporting this report from QB.
|
|
The QB data will be processed, filling the columns with data.
|
|
Click on the Reconcile tab.
STEP #5: Make any changes necessary to the State UI Tax Settings, as noted.
STEP #6: Make note of any adjustment amounts.
|
|
STEP #7: Click on the Report tab.
Verify the Account numbers, and Company information. The number in the gray box following the UI Employer # and Withholding ID # is a check digit that is calculated from the ID#.
The first time you use the Plugin, you will have to enter your company Telephone Number (Export Mode Only: enter Employer Name & Address as well). These will be saved and automatically filled-in thereafter.
Verify the monthly employee counts and change the value if necessary.
Make any other appropriate selections, and enter any Part D additions/corrections if necessary.
|
|
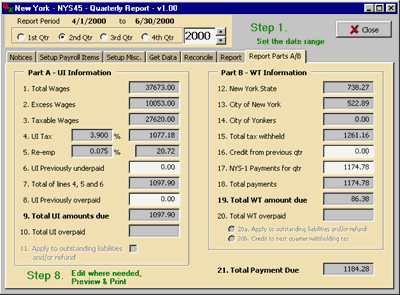
STEP #8: Click on the Report Parts A/B tab.
Verify the values.
In Part A, Lines 6 and 8, enter the appropriate values, if applicable.
In Part B, Line 16 enter the appropriate value, if applicable.
In Part B, Line 17 verify the value, and edit if necessary.
If Part B, Line 20 shows an overpayment, select your choice of 20a or 20b.
|
| The first time you use the Plugin, select Print Setup... from Qxtender's File menu to setup your printer. |
|
Click the Preview button on Qxtender's toolbar (or choose Print Prevew from the File menu).
The first page (not shown here) is an information sheet with instructions for proofing the report and a target mark in the upper left corner to check printer alignment. Be sure to read the instructions on the page after printing the return.
Click the Next button (>>) on the Preview window to view the following page (shown here). This is the NYS-45 Page 1.
NOTE: As of version 4.0, released Sept 2010, zero values print blank instead of "0.00" , per new tax agency rules.
|
|
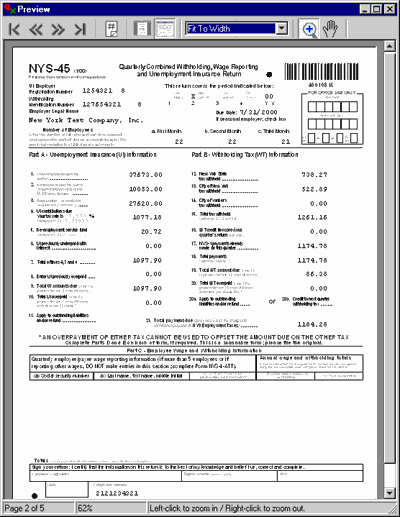
Click the Next button (>>) again.
Verify the data on NYS-45 Page 2.
|
|
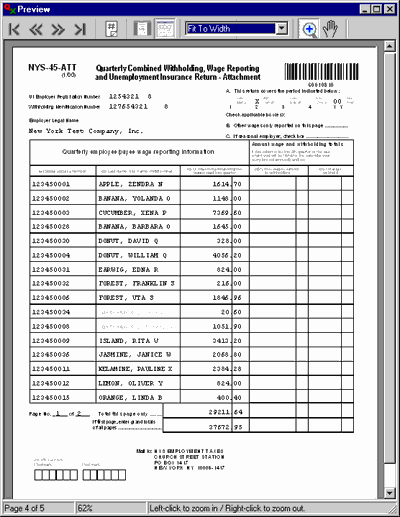
Click the Next button (>>) to view the subsequent page(s) if you have more than 5 employees. These pages will be in the NYS-45-ATT format.
NOTE: As of version 4.0, released Sept 2010, zero values print blank instead of "0.00" , per new tax agency rules.
|
| Close the preview, then click the Print button on Qxtender's toolbar (or select "Print" from the File menu) to print the report. |
|
Copyright Qtools Software - © all rights reserved
QuickBooks, QuickBooks Pro, QuickBooks Premier & QuickBooks Enterprise are registered trademarks of Intuit, Inc.
|
|
|